Wax-Dipped
Amaryllis Bulb
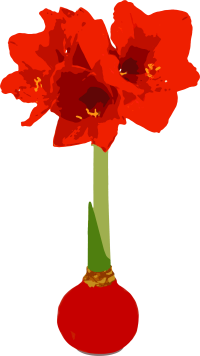 No planting or watering is required.
Simply place the bulb in your home and enjoy its beautiful flowers.
No planting or watering is required.
Simply place the bulb in your home and enjoy its beautiful flowers.
The bulb will send up a stalk with a bud that should produce three or more flowers (usually four). When the blooms are spent, cut the stalk near (maybe half an inch above) the bulb and discard the old stalk. A typical waxed amaryllis bulb will give you a stalk of flowers two or three times.
Your waxed amaryllis bulb was designed to be disposed of when it no longer gives you blooms.
HOWEVER, there is a way for you to extend the life of your waxed amaryllis bulb.
These instructions are only for those of you who wish to attempt to remove your bulb from its wax coating and replant it. Waxed bulbs were never intended to be used for more than a few weeks. Following these instructions will not guarantee your recovered amaryllis will survive or produce flowers, however, we have had a high success rate in our trials.
We recovered over a dozen amaryllis bulbs from their wax coverings and planted them. Nearly all of them (if not all) performed very well. Because they've been through quite a lot to be wax-dipped bulbs—if your bulb survives—you may not get blooms the first year after they've been planted, but most of our recovered amaryllis put up foliage and blooms for a couple of years (usually only once a year) after they were planted.
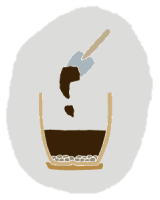
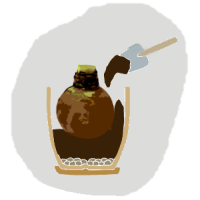
Once your amaryllis is completely finished providing stalks and blooms, carefully remove the wax. If you are unable to simply peel the wax off, use a knife (a butter knife will probably work well) to create a slit starting from wax at the top of the bulb and circling down and around to the other side. Be very careful to only cut the wax and not into the bulb. The wax should peel off fairly easily.
With the bulb removed from its wax, treat it like any other amaryllis bulb.
Recovered Amaryllis Bulb
After you've removed your Amaryllis bulb from its wax covering. Do this only after your wax-dipped amaryllis quits producing flowers. Read the instructions to the left to remove the wax covering.
As a houseplant
Find a container at least two inches wider than the amaryllis and twice as tall with good drainage (drain holes and saucer). Fill the container about half full of soil (potting mix/potting medium).
Place the amaryllis bulb on top of the soil with its stem facing up. Add more soil/potting mix around the bulb until about a fourth of the bulb is visible. You can cover more than a fourth, but for best results at least a small part of the bulb and the stem should be above the soil.
Water the plant well once it's planted and then maintain it as you do your other houseplants.
As an outdoor plant
Your amaryllis bulb can be planted outdoors in zones 9-11.

Dig a hole twice as wide and tall as the bulb. Add soil to the hole until the base of the stem of the bulb—when placed on top of the soil—is higher than ground level. With the bulb on top of the middle of the added soil, fill the hole until only the stem is showing and pack the soil gently with your hand. Add a little more soil if needed.
Water the plant well once it's planted and then maintain it as you do the other perennials in your garden.
Unboxing
Annuals
Perennials
Shrubs
Trees
House Plants